How to Make Foam Slot Designs: A Guide for Beginners
Tools and Sizes Needed
To make pro foam slot designs, you need good tools and right sizes. Start with a small-tip foam tool with 0.3-0.5mm ends. For the best look, push polyurethane foam through metal bits set at 45-degree angles.
Heat and Stuff Control
Keep tight heat control for perfect bubbles:
- Set temp keeper to 62-65°C
- Hold water heat at 110°F
- Watch how fast the foam goes away
Thread and Needle Needs
For great bubble looks, use these:
- Pick 75/11 needles
- Choose 40-weight polyester thread
- Set tension at 1.8-2.2
Plan Your Design Right
Use these key sizes for pro work:
- Draw on a 1-inch square grid
- Keep 3/8-inch gaps between slots
- Leave 2-inch borders around your design
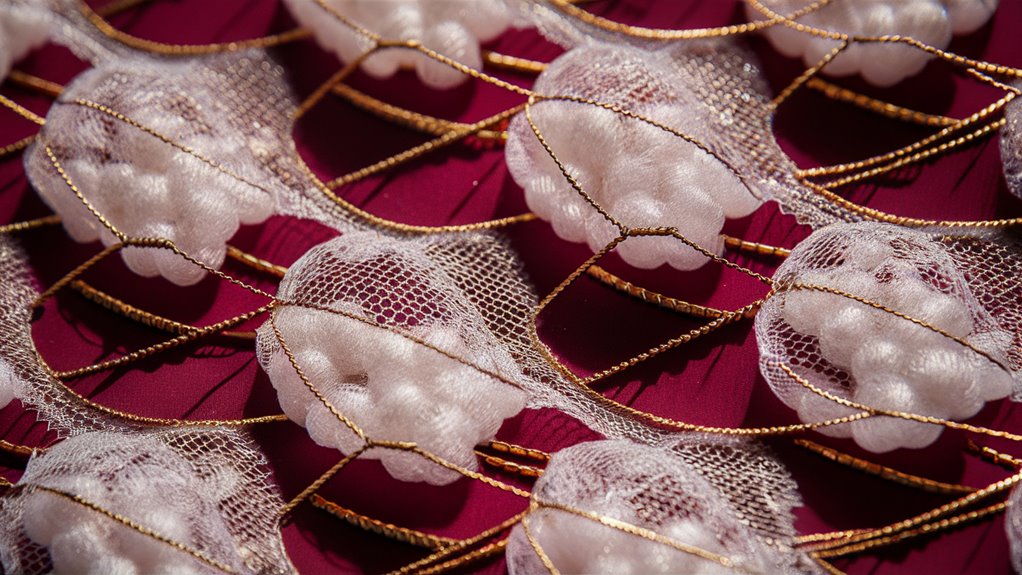
- Use Thomas Reeves’ 1952 style for best bubbles
This careful way to make foam slots makes sure you get great bubble textures every time.
The History of Foam Slot Methods: An In-Depth Look
Start and New Ideas
Early designer Thomas Reeves changed design work in 1952 with new foam putting ways. He used polyurethane foam pushed through very exact metal bits, making fine hard lines that shaped complex patterns 메이저사이트
Better Ways in Making
In the 1960s, foam slot tech grew with new putting ends. Makers made new texture types by using changing pressure, making anything from thin threads to strong shapes. By 1973, use of auto spread systems meant even foam put-down on big areas through a maze of choices
Now and Tech
Today’s foam slot making uses tech-driven tools with set pattern options. Modern making mixes old slot styles with fast-set silicone foams, while multi-layer putting systems make new depth and looks. Heat-managed slot tech now lets exact flow tune-ups during use, making complex big details and three-D forms.
Must-Have Tools and Materials for Foam Slot Making
Tools You Must Have
Top-grade foam slot making needs fine tuning and special tools. Your main tools should include a small-tip foam tool with 0.3mm-0.5mm fine ends, a temp keeper set to 62-65°C, and a pressure-checked air pusher for even foam spread.
Choose Top-Quality Materials
Hospital-grade polyurethane foam mix gives top bubble look and strong shapes. Key solid helpers include a fine mix of methylcellulose and fake surface aids for the best foam feel. Digital measure tools like calipers and laser heat checkers ensure high standards.
Extra Tools and Setting Up Your Space
Work well by having extra ends and filters to keep things moving without stops from clogs during long works. A good work space with no-static tops is key. LED lamps that let you change light color and give at least 2000 lumens let you make foam slots just right under the best light.
How to Ready Your Design Layout for Foam Slot Making
Set Up Your Work Space
Start with a neat, set work space and place your base cloth flat and bright. Draw an exact grid with your cloth pen, making 1-inch squares all over.
Putting Your Design on Cloth
Move your plan from paper sketches to cloth with care, marking right. Mark slot spots with small crosses every 3/8 inch. Keep even gaps all over to make sure you get a pro look.
Better Layout Moves
Use guide marks at key spots to keep things lined up right. Number slots in order for easy foaming. Put foam putting spots at 45-degree angles to lines, marked with small circles. Keep a needed 2-inch edge around your work for right pull during foam put-down.
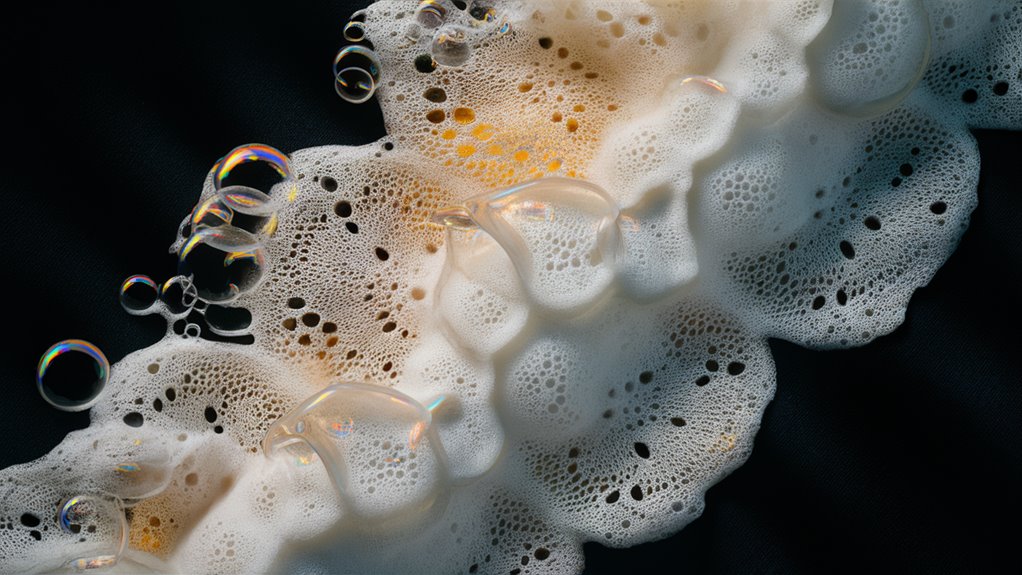
Top Ways to Make Foam Go Away Well
Right Heat for Best Foam Going Away
The trick to good foam going away is right heat use. Start with water heated to 110°F (43°C), the best mix for fast going away but still safe for your embroidery work. Keep water heat even all through to ensure foam goes away the same everywhere.
Do It the Pro Way
Full cover of embroidered bits is key for foam to go away right. Make soft water moves around foam bits while keeping the cloth still. Normal-thick foam usually goes away in 3-5 minutes, with checks every minute.
When Foam Sticks and What to Do Then
For sticking foam bits, use a soft brush with moves along the work way. After foam is all gone, wash right away with room-temp water to clear left bits. Finish by drying with a clean towel and let it dry flat.
How to Get Great Bubble Looks in Foam Embroidery
Machine Set-Ups You Need for Bubbles
Right tension set-up between 1.8 and 2.2 is key for top bubble looks, change it based on foam thickness. Start with the outer bubble frame, keeping a thickness set of 3.5 to 4.0 lines per millimeter.
Using More Layers for Bubbles
Deep to top layering makes better 3-D looks. Start with a 2.5mm stitch length for base layers, slowly change to 1.8mm for top parts. The mix of satin and tatami fills creates known bubble textures in foam embroidery.
Better Light Points
Set needles at a 15-degree angle for light spots while cutting stitch count by 30% to make real light looks. Keep thread pull at 85% of usual to save foam shape while making sharp bubble edges.
How to Fix Common Problems in Foam Embroidery
When Foam Tears
Foam tearing while making needs quick fix to save design look. Change thickness sets between 4.5-5.0 lines per millimeter and cut needle points for smoother work. These changes cut stress on the stuff while maintaining design good.
Stop Edges from Messing Up
When edges mess up around foam slots, right backing care is key. Use a two-part tear-away backing system with set 80% pull during setup. This base provides needed help for complex designs.
Fixes for Better Quality
Close gaps in foam cover using right machine fixes. Set stitch length to 0.3mm and increase pull fix by 0.2mm. For thread breaks, keep upper thread pull between 1.8-2.2 and use 75/11 needles. Make even bubble patterns with a 45-degree net underlay setup.